strongSwan is an open-source, cross-platform utility that helps us to configure IPSec tunnel on Linux environments. We can install the strongSwan and configure the IPSec VPN on Ubuntu and Debian environments. I’ve already configured a Ubuntu server on AWS. Using the IPSec VPN, I will access the local web applications from the AWS cloud.

Prerequisite
You must have a root account configured on Ubuntu or a non-root account with root privileges. If you don’t have a pre-configured user account, create one.
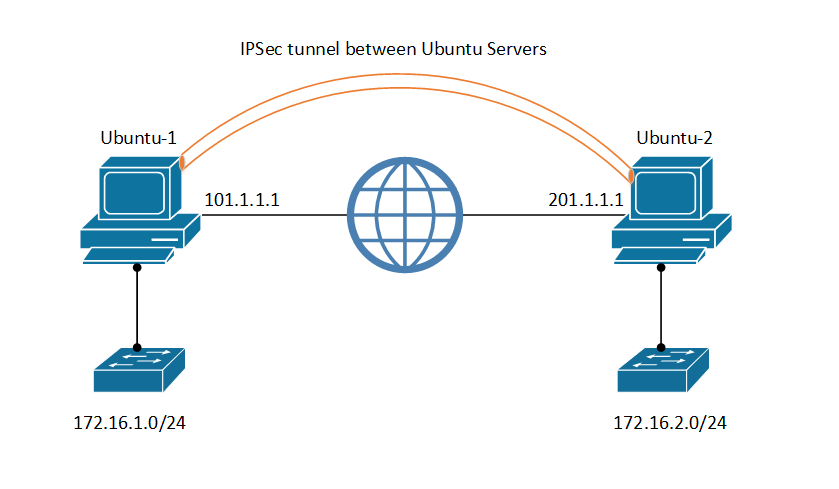
We have two different Ubuntu servers running on 22.04. Before moving further, it is also essential to understand the topology we are using for this article:

We have Ubuntu-1 with public IP Address 101.1.1.1, and Ubuntu-2 with a different Public IP Address, i.e., 202.1.1.1. Both machines are reachable to each other. Both machines have an additional interface with IP Address 172.16.1.0/24 and 172.16.2.0/24, respectively.
By default, the Linux kernel doesn’t perform any routing. You must configure the Linux kernel to enable the routing. Open the /etc/sysctl.conf file using vi or nano, set the below parameters and save the file.
net.ipv4.ip_forward = 1
net.ipv4.conf.all.accept_redirects = 0
net.ipv4.conf.all.send_redirects = 0
By using the below configuration, you can enable routing for IPv6 as well.
net.ipv6.conf.all.forwarding = 1
Now, load these kernel parameters using the below command:
sudo sysctl --load
You will get the below output while loading these parameters in runtime:
user@ubuntu1:~$ sudo sysctl --load
net.ipv4.ip_forward = 1
net.ipv6.conf.all.forwarding = 1
net.ipv4.conf.all.accept_redirects = 0
net.ipv4.conf.all.send_redirects = 0
Additionally, if the UFW is enabled, you must configure the below rules to allow the traffic. Add the following line to the Ubuntu-1:
*nat
:POSTROUTING ACCEPT [0:0]
-A POSTROUTING -s 172.16.2.0/24 -d 172.16.1.0/24 -j MASQUERADE
COMMIT
Similarly, on Ubuntu-2:
*nat
:POSTROUTING ACCEPT [0:0]
-A POSTROUTING -s 172.16.1.0/24 -d 172.16.2.0/24 -j MASQUERADE
COMMIT
Finally, enable the changes by restarting ufw.
sudo ufw disable && sudo ufw enable
Let’s start configuring strongSwan.
Installing strongSwan on Ubuntu
We will start the strongSwan installation by updating the index of locally installed packages. Execute the below commands on both machines:
user@ubuntu1:~$ sudo sudo apt update
Once it completes, run the below command to install the strongSwan on both machines:
sudo apt install strongswan
By default, after the installation, the strongswan should be up and running. You can verify the service status using the below command:
sudo systemctl status ipsec.service
Before configuring anything, let’s take the backup of the original files on both Ubuntu-1 and Ubuntu-2.
On both Ubuntu-1 & Ubuntu-2, execute below commands:
sudo cp /etc/ipsec.conf{,.orig}
sudo cp /etc/ipsec.secrets{,.orig}
Configuring IPSec Peer Authentication on Ubuntu-1 and Ubuntu-2
Now, let’s define the remote site and authentication method. strongSwan supports different types of authentication methods. However, we will use the Pre-Shared Key to authenticate the peer.
On Ubuntu-1, edit the /etc/ipsec.secrets file, and set the below configuration:
201.1.1.1 101.1.1.1 : PSK "123456789"
Similarly, on Ubuntu-2, edit the /etc/ipsec.secrets file, and set the below configuration:
201.1.1.1 101.1.1.1 : PSK "123456789"
You can use the /dev/urandom to generate a strong PSK.
Configuring IPSec Tunnel on Ubuntu-1 and Ubuntu-2
Finally, we will configure IPSec on both of our Ubuntu servers. We need to modify the /etc/ipsec.conf file of each server.
On Ubuntu-1, edit the /etc/ipsec.conf file and add the below configuration:
conn ubuntu1-to-ubuntu2
type=tunnel
auto=start
keyexchange=ikev1
authby=secret
left=101.1.1.1
leftsubnet=172.16.1.0/24
right=201.1.1.1
rightsubnet=172.16.2.0/24
ike=aes256-sha1-modp1024!
esp=aes256-sha1!
keyingtries=%forever
ikelifetime=28800s
lifetime=3600s
Similarly, on Ubuntu-2, edit the /etc/ipsec.conf file and add the below configuration:
conn ubuntu2-to-ubuntu1
type=tunnel
auto=start
keyexchange=ikev1
authby=secret
left=201.1.1.1
leftsubnet=172.16.2.0/24
right=101.1.1.1
rightsubnet=172.16.1.0/24
ike=aes256-sha1-modp1024!
esp=aes256-sha1!
ikelifetime=28800s
lifetime=3600s
This is the basic IPSec configuration with IKEv1 protocol. Below is the information on the parameters we used:
- conn: Connection Name for the IPSec Tunnel
- type: IPSec Tunnel Type, Tunnel / Transport
- auto: IPsec startup operations
- keyexchange: IKE protocol version
- authby: Authentication Method
- left: Public IP Address of the local gateway
- leftsubnet: Private IP Address of the local gateway
- right: Public IP Address of the remote gateway
- rightsubnet: Private IP Address of the remote gateway
- ike: Cipher Suites for IKE phase 1
- esp: Cipher Suites for IKE phase 2
- ikelifetime: Phase 1 lifetime
- lifetime: Phase 2 lifetime
However, you can also configure advanced configurations, including NAT-T and IKEv2. You may use the ipsec manual for more information on available options.
man ipsec.conf
Verifying the IPSec tunnel configuration on Ubuntu
Finally, restart the ipsec on both servers and check the tunnel status. You can restart the ipsec tunnel using the below command.
sudo ipsec restart
Now, navigate to the Ubuntu-1 terminal and type the following command to check the ipsec status:
sudo ipsec status
You will get the IPSec tunnel up and running.
user@ubuntu1:~$ sudo ipsec status
Security Associations (1 up, 0 connecting):
ubuntu1-to-ubuntu2[1]: ESTABLISHED 2 minutes ago, 101.1.1.1[101.1.1.1]...201.1.1.1[201.1.1.1]
ubuntu1-to-ubuntu2{1}: INSTALLED, TUNNEL, reqid 1, ESP SPIs: ced18389_i c7e7deeb_o
ubuntu1-to-ubuntu2{1}: 172.16.1.0/24 === 172.16.2.0/24
Now, try to ping to ubuntu2 from ubuntu1. You should get the ping response.
user@ubuntu1:~$ ping 172.16.2.1 -c 4
PING 172.16.2.1 (172.16.2.1) 56(84) bytes of data.
64 bytes from 172.16.2.1: icmp_seq=1 ttl=64 time=1.17 ms
64 bytes from 172.16.2.1: icmp_seq=2 ttl=64 time=1.22 ms
64 bytes from 172.16.2.1: icmp_seq=3 ttl=64 time=1.26 ms
64 bytes from 172.16.2.1: icmp_seq=4 ttl=64 time=0.965 ms
This completes our demonstration of IPSec configuration on the Ubuntu server. The configuration should be the same on Debian-based distros.
Further Reading
- IPSec tunnel between Palo Alto Networks Firewall and Ubuntu
- mkdir recursive – Creating Linux Directories Recursively
- Configure SNMPv3 on CentOS
- Install Apache Web Server on Ubuntu 22.04
- A Step-by-Step Guide to Deploy Ubuntu on AWS Lightsail
- How to install Apache Web Server on CentOS 7
Conclusion
strongSwan is an open-source, cross-platform utility that helps us to configure the IPSec tunnel. We set up an IPSec tunnel between two different Ubuntu servers using strongSwan. We can reach the private network of the secondary gateway using the IPSec tunnel.
Did you find this article helpful? Please share it on social media platforms and show us some love 🙂