In this article, we will add the Palo Alto Networks Firewall to Panorama. Palo Alto Networks Panorama provides centralized management of Palo Alto Networks products, such as Firewalls, Prisma, etc. Even if your firewalls are configured in different geographical regions, you can integrate them with Panorama. Palo Alto Networks recommends you use the same PANOS on both Panorama and Firewall. However, If you have a Higher PANOS version on Panorama it will also be acceptable. Let’s start integrating the firewall with Panorama.
How to add Palo Alto Networks Firewall in Panorama
Although, bidirectional connectivity over TCP/3389 between Palo Alto Networks Panorama and Firewalls. Here, I do have both Firewall and Panorama in the same subnet.
In case you are using a VM Series Palo Alto Networks firewall, ensure you have a valid serial number on your Firewall to start integrating.
I am using PA-VM with management IP 192.168.31.205 and Panorama with management IP 192.168.31.250.
Step 1: Adding a Palo Alto Networks Firewall into Panorama Device Summary
Here, we will add a Palo Alto Networks Firewall in the Panorama Summary. Log in to the Palo Alto Networks firewall and copy the serial number of the Palo Alto Networks firewall.
Log in to the Panorama using administrative credentials, navigate to Panorama > Managed Devices > Summary, and click on Add.
Paste the serial number you have copied from Palo Alto Networks Firewall Dashboard. Uncheck the Associate Devices checkbox since this is a new device and we don’t have existing Device Group and Templates with us.
Click on the Generate Auth Key to generate an Authentication key required to register new devices into Panorama. Click on Copy Auth Key to the clipboard to copy the Auth Key.
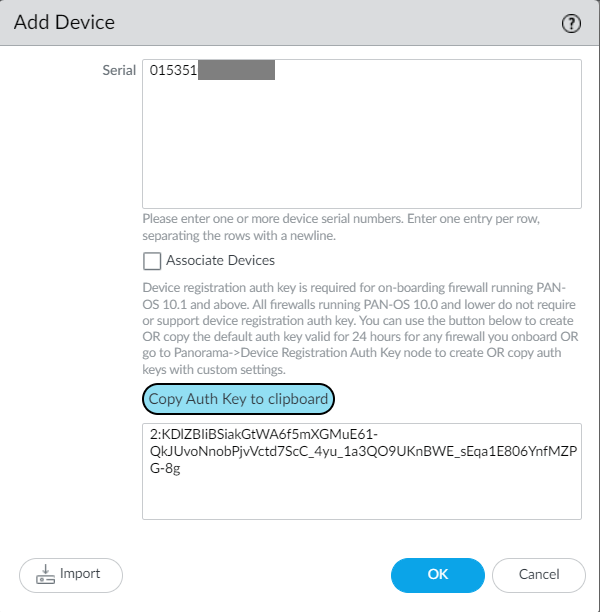
Commit the changes to Panorama.
Step 2: Adding the Panorama Information to the Palo Alto Networks Firewall
Now, we will add the Device Registration Auth Key along with the Panorama IP address on the Palo Alto Networks Firewall.
Log in to Palo Alto Networks Firewall, navigate to Device > Setup > Management > Panorama Settings, and configure the Panorama IP Address and Auth key.
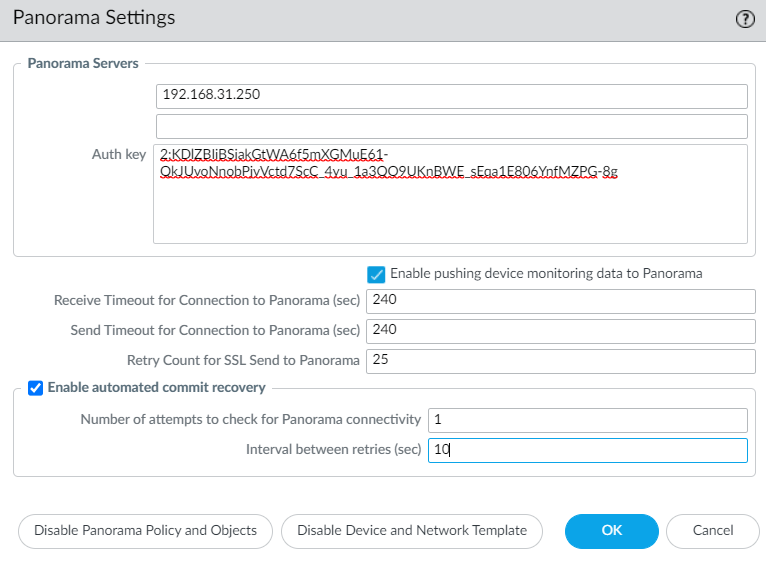
Commit the changes to the Palo Alto Networks firewall.
Step 3: Verify the connectivity between Palo Alto Networks Firewall and Panorama
Login to Palo Alto Networks Panorama and navigate to Panorama > Managed Devices > Summary. You will notice that your VM firewall is now showing connected to Palo Alto Networks Panorama.
If you are using permitted IP addresses on Panorama/Palo Alto Networks management interface, ensure to add it into the list.

In case, if it is still showing disconnected, please wait for a couple of seconds, and it should show connected.
Step 4: Import device configuration into Panorama
Now, we will import the device configuration into Panorama. Login to Panorama, navigate to Panorama > Setup > Operations, and click on Import device configuration to Panorama under configuration management.
Select the device for which you want to import the configuration into Panorama. Define the Template Name, Device Group Name, and Rule Import Location, and click on OK.
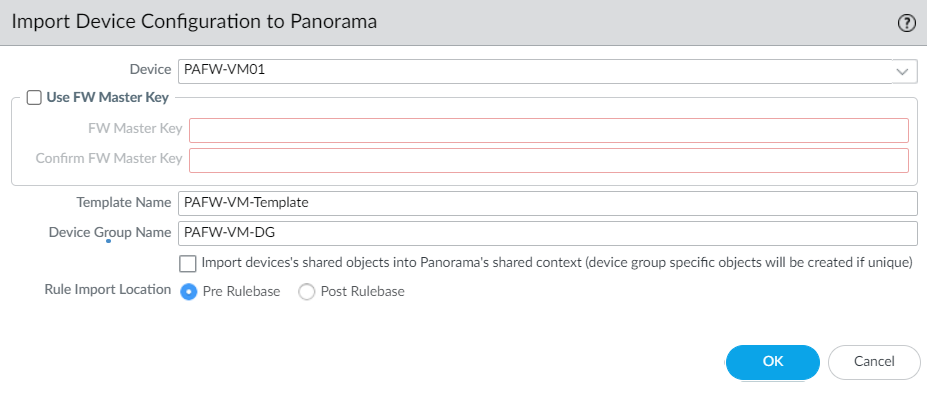
You will notice that additional tabs are now visible, i.e., Policies, Objects, Network, and Device.
Visit on each tab, and verify the configuration.
Now, commit the confirmation to Panorama.
Step 4: Export the device configuration from Panorama to Firewall
In this step, we need to export the device configuration to Palo Alto Networks Firewall. Login to Panorama, navigate to Panorama > Setup > Operations, and click on Export or push device config bundle.
Select the device and verify the serial number of the device. Click on OK.
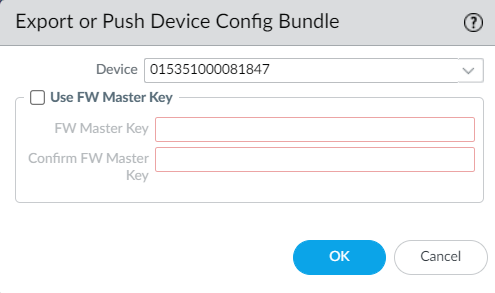
Now, select Push & Commit under Export or Push Config Bundle.
All the configuration now will be sent to Palo Alto Networks Firewall and It will trigger a new commit job onto Palo Alto Networks Firewall.
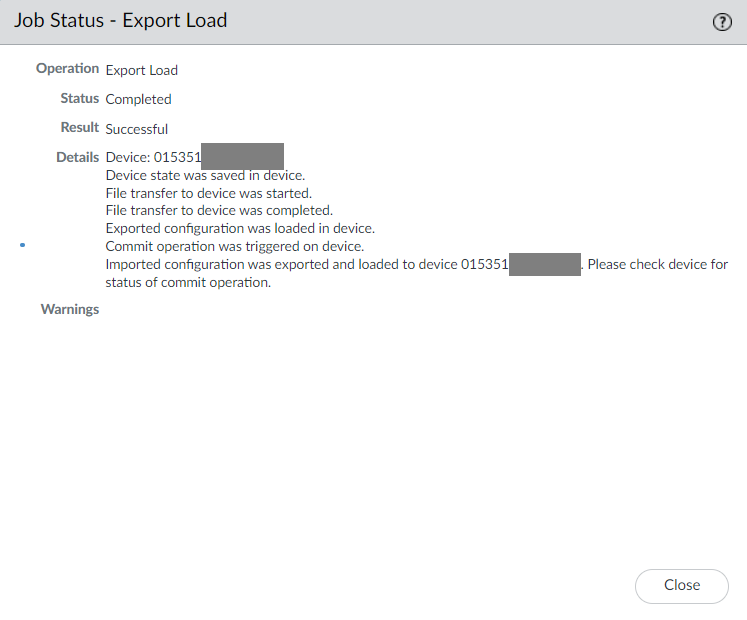
You may log in to Palo Alto Networks Firewall and check for the latest commit job to know more information.

You will notice that the color of the Policies/Object configuration on the Palo Alto Networks Firewall has changed and now they are read-only.

Finally, we need to export the Network and device configuration to Firewall. Login to Panorama, click on commit and select Push to Devices. Verify the Device Group and Template and click on Push.
It will trigger two commit jobs on the Firewall for network and device configuration.
That it! We have completed the Panorama Integration Process.
Step 5: (Optional) Push template configuration using Force template value
By default, the Network and Device configuration are pushed to the firewall. However, it will not override the existing configuration on the firewall.
Here, the issue is you won’t be able to change the configuration of existing objects. For Example, if you just want to add a static route to the virtual router, you will find the new routes are not updated in Firewall. Although, the same route is available in Panorama.
To avoid this situation, you need to Push template configuration using the Force template value. Login to Panorama, click on commit and select Push to Devices. Click on edit selection, navigate to templates, and also mark the force template value.
You will get a warning message, just click on OK and proceed further. Click on OK and then Push.
It will trigger a new commit job to the Palo Alto Networks Firewall.
Related Articles
- How to configure High Availability in Palo Alto Networks Firewall
- Automated backup from Palo Alto Networks Firewall without Panorama
- How to install Cisco ASAv Firewall in EVE-NG Simulator
- How to configure Static Routes on Cisco ASA Firewall
- Cisco ASA: Security Levels and Zones Explained
Summary
In this article, we have successfully added the Palo Alto Networks Firewall into Panorama. First, we added the firewall to the Panorama summary, and then we imported the configuration from the firewall to Panorama. Then, we exported the same configuration to the Firewall. Finally, we selected the Force Template Value and make the integration completed.
I hope you find this article helpful. Please share this article on social platforms and show us some love 🙂
I’m trying to add a VM-Series Palo Alto FW into Panorama. When I log into the FW and go to the Panorama Settings screen, it gives me 2 fields for panorama servers but no field for the Auth Key. Everything else looks the same. Should the auth key go in the second Panorama server field?
Hello Clint, Thank you for your comment.
Auth key feature started from PANOS 10.1.0. If your firewalls/panorama is on a lower PANOS version, just ignore this field.